This christmas my partner and I was ready early with all the preparations, so we found ourselves with a bit of time on our hands to do things that we always meant to do, but never had the time. I’ve had a Raspberry Pi 3B sitting on my shelf for a long time that I was going to set up to run a home automation setup. I haven’t had the time to sit down and go through in detail what is required, and while waiting the online solutions have gotten a lot better. It won’t save me from if I lose internet connectivity, but good enough to work for now, so I have decided to repurpose the Raspberry Pi for a different job.
Over the last year there has been a lot of focus on data and tracking of people in the media, Facebook and Google have been a focus of a lot of these stories, but data is the new gold rush, so everyone is collecting as much as possible on their users. I wanted to reduce the amount of data I share with the world, and hopefully doing so in a seamless way that doesn’t impact our day to day. The last things I want to do is install something custom onto all the different devices I have, the operational burden of that is far too high. A good way would be to install something on my network that would filter out the “bad” requests. There are a few enterprise grade solutions for this, but they are generally big, bulky, difficult to manage, and expensive. Since I have a Raspberry Pi that I’m not using, an inexpensive device to both buy and run, I started looking for something that I can run on that.
Enter Pi-hole, a simple and automated solution that works as a DNS forwarder and filters on a list of known bad entries that’s updated frequently (about 113,000 blocked entries at time of writing). It is not as effective as installing a browser plugin, but it will filter all of the devices on our network, and prevent our smart devices from dialing home with our information. The easy way is to run it in a docker container on your Raspberry Pi, and then configure your router to broadcast the Raspberry Pi as the authoritative DNS server on your network using DHCP options.
Set up Pi-hole on your Raspberry Pi
When I started looking at Pi-hole, there was an option of running it in a docker container, which is perfect as it makes it very simple to set up and you don’t end up with libraries plastered all over your system. It also makes the upgrade path very simple, as you just need to rotate in a new container and it will have a clean install, no files from a previous version hanging around. With that in mind, I started looking into how to run docker on my Raspberry Pi.
Going to the Docker website, there is a simple shell script that you can run on the host to install docker for the Pi, but I don’t like having to log into the instance itself and run scripts. Often you forget something, and you need to document a set of steps you go through, so when inevitably something breaks you know how to rebuild it. The better way is to spend a bit more effort up front and build it out using configuration management as code. Ansible is my favorite tool for this kind of task, it runs on any Linux distribution you can run python on, perfect for the Pi.
First thing I did was set up a new role, so it could be published on Ansible Galaxy. You can find the role here, with detailed instructions on how to use it. If you run into any problems, please raise an issue and I’ll try to fix it up as soon as possible.
The role does 3 main things:
- Install Docker
- Install Pip and the docker python library - a dependency for configuring docker containers using Ansible
- Configure the Pi-hole docker container and set it up to run as a service that starts automatically
Once you have run the Ansible playbook on your Pi, you should have a functional Pi-hole deployed and configured. Ready to be used to filter your internet bound traffic.
Configure your router
Next up we need to configure your router. There are two approaches to this, we can either tell the router to use the newly deployed Pi-hole as the main DNS server, or we can tell the router to broadcast the ip of the pi-hole as the default DNS server as part of the DHCP packages.
I went down the second path, so I could log which devices requested DNS, and how many of them were blocked. After running it for a few days, I noticed my TV is a big offender and makes a lot of DNS requests that gets blocked.
There are quite a few different options you can set for DHCP, and they are all outlined in the RFC, but if you’re like me and prefers plain english, here is a good reference on the different options you can use.
From the list you can see that option 6 is the one you use to broadcast which DNS server all the devices on the network should be using. I use a router which I’ve installed DD-WRT on. It has a simple user interface to add additional options to DHCP. You will have to look at your router manual to see where you can input additional DHCP options.
Add the option like below, and you should be sending out the new configuration to all your devices.
|
|
It will take a bit of time for your devices to pick up the new settings, depending on the lifetime of the lease they have on their IP. Generally not more than a day.
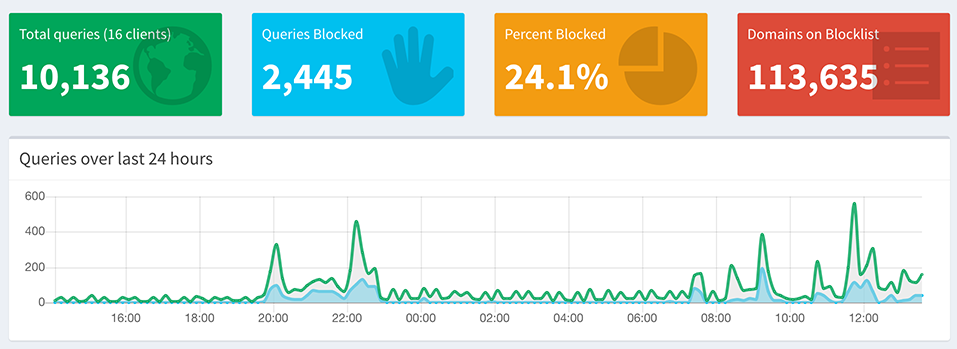
Dashboard goodness
Once you have that setup and running, you should be able to log into your Pi-hole by going to http://<ip of raspberry pi>/admin/ and see metrics on a dashboard like below. What surprised me was the number of requests that got blocked. As you can see from the screenshot of my dashboard that I took after running the Pi-hole for a few days, over 24% of DNS requests have been blocked.